
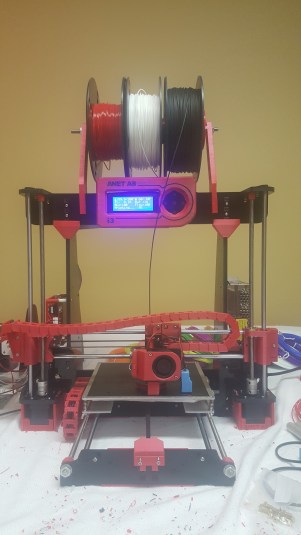
Here are the details about my 3D printer.
Anet A8 Desktop 3D Printer Prusa i3 DIY Kit
USD$ 183.57
Comments: This is a cheap 3D printer in more than just price. The majority of the printer is made from laser-cut acrylic, which is a terrible material prone to fractures. It uses a frustrating screw and nut system to hold itself together. It takes hours to just peel off all the scratch protection paper and close to a full day to put it together. It came with super lackluster instructions on a micro sd card but substituting those with a quick youtube search is easy enough. The design is a Chinese knock-off of the Prusa I3 which from reputation is the world’s most popular 3D printer, mostly resulting from its open source design. My particular kit came with 2 broken pieces and through use, managed to break a 3rd piece as well. Calibrating the printer is also a frustrating process which resulted in lots of scratches in the aluminum bed and plenty of wasted filament. Nobody who doesn’t love tinkering should ever buy this kit. However, this is still an amazing printer for a number of reasons. For starters, it’s only 200$ which considering its print volume and overall precision makes it an amazing deal. It also has an enormous community focused around it, making it super easy to track down tutorials and mods. It’s made from entirely off the shelf components making it easy to buy replacement motors, belts, rods, etc… and best of all it’s capable of making its own replacement pieces. So if you have the time, patience and tinkering skills this printer is competitive spec wise with ones that are 2 or 3 times its price.
Printed Upgrades


Comments: This is the spool holder I recommend. It mounts on top of the printer which is definitely the optimal place for it since it’ll minimize strain on the filament. The file includes a nut, but I didn’t find very much use for it. You’ll need to print the support arm twice and depending on how many spools you wish to suspend you might want a second bolt. My setup has 2 bolts and it is able to hold 3 1kg spools at the same time. It is designed to fit on an m8 threaded rod which I purchased separately here and its held in place with 4 nuts which came with the initial kit. There’s a screw mounting system on the inside leg of the arm, but it manages to sit securely without needing it.
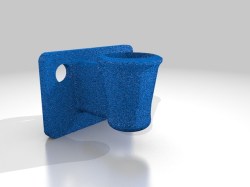
Comments: This is a typical filament guide designed to ensure the filament will always be fed into the extruder from the same direction. Personally, I don’t find it especially necessary when paired with the spool holder mentioned above but your mileage might vary. The most notable reason I have it installed is that it holds the filament away from the cable chain and keeps it from rubbing against it. It gets installed on the extruder chassis with 2 screws that attach to the linear bearing mount. I’ve tried other filament guides which clipped onto the main frame but found their positioning and fixation strategy inferior. Unfortunately, this piece adds too much thickness that will require a slightly longer screw size than the ones provided with the kit. It’s a problem that could have been avoided if the holes were counter sunk but finding new screws wasn’t particularly difficult for me anyway. Screwing the piece into place is a bit of a challenge though since the funnel blocks you from getting straight at the screws with a screw driver, and you are forced to go at them from an angle.


Comments: The frame of the Anet a8 is kind of flimsy and tends to bend under the strain of the tight belts. That’s why a number of people have designed braces which add to the overall stability of the printer. I went with this design mostly for its appearance since I find the honeycomb pattern a bit more pleasant to look at than some of the alternatives. Unfortunately, this design will require you to partially disassemble the printer in order to install it which is a pain, but is probably worth the effort. I found that installing the square piece didn’t leave me much room for cable management but with some effort, I managed to squeeze everything into a place that didn’t interfere with the guide rods. These are large prints and since they are used for support I recommend high fill settings too so expect them to take a long time and use a lot of filament.
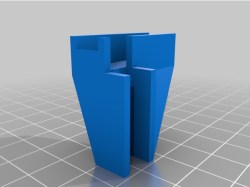
Comments: This is another piece that reinforces the printer’s frame. The printer is prone to vibrations and adding reinforcement to such an important junction seems like a good idea. I can’t really say how well they work as the printer works fine either way, but since it’s so easy to install them (they just clip on and slide into place) you might as well use them. Of course, you’ll want to print 2 of them but other than that there’s not a whole lot to say other than they have a nice minimalist appearance compared to some of the other options I’ve stumbled across.
Comments: This is the same idea as the T-corner above except it reinforces the frame where the right Z-axis motor frame meets the horizontal support. It just clips into place much like its counterparts although I found it much more difficult to slide into its correct position, probably because of some loose screws. You’ll only need to print one of these guys since the mainboard will block you from installing a second one on the opposite side. But even if that wasn’t the case, you’d need to use a mirrored image instead.


Comments: This is more or less a reprint of the original x-axis mounts provided by the kit. I felt that my printer would look better if all the printed components were the same color so I replaced the white stock parts. There is a small modification to the piece holding the motor that gives you a groove to route the wire from the end switch but it’s hardly a worthwhile improvement. This file also includes some other pieces like the belt tightener which allows you to tighten 2 screws to increase the tension on the x-axis belt. It is worth mentioning that I don’t recommend printing the right mount in its default orientation. My printer had a hard time dealing with the curved overhang so rotating it to stand up is the better approach. The designer also included a design for the threaded bearing disk, but I still had the metal ones that came with the kit so it didn’t make sense to switch to plastic. Of course replacing such a fundamental piece of the printer takes a lot of work and any printing inaccuracies might make the printer unusable, so unless you really, really, really hate the mismatched color, installing these replacement pieces is more trouble than its worth.


Comments: So this mod is just a cleaner way to route the cables that run from the mainboard to the hot end. It also looks pretty cool in my opinion. Anyways, the biggest problem with this piece is that you have to run all the wires through the middle of the chain which wouldn’t be too hard if only a few wires needed to go through it, unfortunately, the extruder chassis has 2 fans, the hot end, the extrusion motor and the auto level sensor, so cramming all that through the chain is a royal pain in the butt especially when you factor in the size of the connectors. I also wound up using 31 chain links between the two mounting pieces. It looks like I could have got away with 29 or 30 but the designer recommended between 30 and 32 so I went with 31 to be safe. I also found that printing the motor end in its default orientation resulted in unusable connection pieces which forced me to reprint it with the channel path facing down.


Comments: So this mod is more or less the same as the one above but this time it routes the cables from the main board to the hot plate. The 2 connections attach to the aluminum frame piece below the hot plate and the piece of the frame that runs through the middle of the printer on the interior. Unlike the other cable chain, you only need to fit one set of wires through it so it’s significantly less hassle to install. I wound up using 11 chain links in mine but that was an oversight on my part, I definitely recommend using at least 13 since going to full extension lifts the cable off the ground, although it does still work if you want to be stingy. A criticism I have for this design is that it runs the chain directly under the hot end when it’s in its home position and you’ll want to raise the heated bed significantly in order to get enough clearance so that the hot end won’t melt the chain. Other than that it’s just a nice way to make sure your printer doesn’t drag its own cables across the table as it prints which could get them snagged and broken.
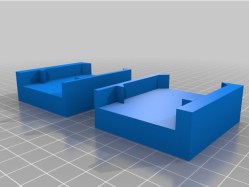
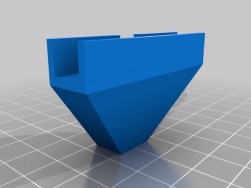
Comments: As you’ve probably gathered from all the frame support mods, the Anet a8’s frame is a flimsy piece of junk. The main support legs of the printer are hollow boxes that don’t have a base or front cover and the motors which control the Z-axis are left suspended above the ground. These supports give the motors a much more stable base to sit on and also provides the printer more surface area to rest on. The file contains 2 variants of the same support piece as well as a third option which lets you print one of each at the same time. The only difference in the two designs is some embossed lettering on the front side which reads “Anet A8”. Personally, I feel like the added branding is pointless since all its doing is telling everyone that you own one of the cheapest 3d printers available. However, it’s pretty clear that others disagree, and will proudly sport the Anet A8 name. Really it makes no difference which side you fall on. I went with the option that prints one of each at the same time since it saved me from needing to do a second print. Installation for these guys is pretty straight forward, just tilt your printer on its side, slide them under the motors and apply pressure until secure. Keep in mind that the fit is going to be tight and any imperfections in the print might need to get filed down before hand.
Comments: In order to disengage the gears which pull the filament into the extruder you need to apply pressure to a screw supported by a spring poking out of the main chassis like a button. Adding this cap on the screw makes it easier to push down without hurting your finger. It’s a super small print that takes only a few minutes to make and it just slips on top of the screw head for installation. Considering how often you need to disengage the gears in order to switch filaments it’s definitely a worthwhile mod.
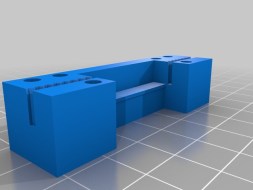
Comments: This piece is a better way to connect the belt to the back of the extruder chassis. Apparently, older versions of the Anet A8 kit included a piece very similar to this made from laser cut acrylic, but due to the high tendency for the part to break while being cut, it was replaced with a half-assed solution where you need to wrap the belt around a screw and fasten it to itself with a zip tie. It works as a half-measure but honestly, it’s really awkward to implement. This part, on the other hand, sits very securely to the back of the chassis right between the bearings and is attached with screws. it holds the belt in place with teeth and leaves holes for you to attach the auto level plate to the chassis. I found that fitting the belt into the jagged slots was really difficult and I had to run a nail file through the slots a few times to make it possible. I also found that my original belt was cut too short for me to reattach so I ended up buying a new belt here. The designer includes multiple designs for the same piece within the file but I never really got around to trying them so I just used the first and most basic option.
Comments: This piece attaches the belt to the underside of the print bed. The kit uses 2 small pieces of acrylic to pinch the belt to the metal frame piece. It’s functional but not very elegant. This piece much like its X-axis counterpart holds the belt in place with teeth and gets securely attached with 4 screws. The Y-axis uses the other half of the belt I purchased earlier. The teeth are designed in a way that it holds onto the very end of the belt with one set of teeth while the other end of the belt runs right through which means only 1 end of the belt needs to get trimmed off.

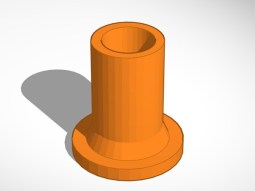
Comments: For whatever reason, the threaded rods used for Z-axis movements are too short to reach the cutouts in the shoulder pieces of the frame, this causes a very noticeable sag in the rod alinement when the extruder is in a low position. This little cap sits on top of the threaded rod giving it just enough extra height to fit into the hole which holds it in a straight position. Printing is fast and easy but installing them required me to remove the shoulder pieces of the frame. I also found that the base of the piece had a little lip around it where it was in contact with the hot bed which needed to get filed down in order to fit in the hole. Since the threaded rods are required to turn in order to make height adjustments it’s very important that the cap fits loosely in the cutout. After first installing the caps I noticed that one the rods was no longer turning, so make sure you can spin the cap around easily with your fingers to prevent the motors from jamming from the extra resistance.


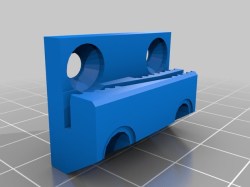
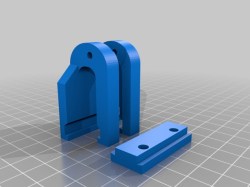
Comments: This little contraption is a nifty way to access the filament inside the extruder without having to unscrew the fan. The file comes in 2 parts which connect together in a hinge with one of the long screws that attach the fan and heat sink to the extruder. The first part attaches directly over top of the blower fan while the other piece goes between the heat sink fan and the grill. By attaching the heatsink, fan, and grill to the hinge piece with short screws and holding the extruder motor together with another set of short screws, we are now able to pull the fan away from the extruder without having to disassemble anything. This has huge advantages when it comes to changing the filament since feeding the new filament into the hole is very difficult without removing the heatsink and taking that off and on is a pain. Understandably, other people have expressed concerns about worse heat dissipation since the heat sink has weaker contact with the extruder than it did when it was screwed to it, and while I definitely believe this is the case, it doesn’t make enough of a difference to harm anything in my experience, however I only ever print in PLA at a low heat setting so I don’t have a lot of heat build up in the first place.

Comments: This mod is a protective plate that covers the wires attached to the power supply. It serves 2 purposes the first is to add a layer of protection that will hopefully stop anyone from accidentally touching the exposed wires and getting themselves electrocuted and the other is to mount a power switch/fuse/male AC wall power adapter to the power supply. This is a great mod that makes the printer feel way more premium than its original design. The switch will give you a way to manually cut the power other than pulling the plug out, which has saved my print bed on multiple occasions when I saw that the auto level sensor was positioned too high and the extruder nozzle was going to scratch up the heated bed. The fuse is a nice addition since it will theoretically save the electronics from getting fried if a power surge occurs and the male power adapter lets you use a standard PC power cable which can be removed without needing to unscrew it from the power supply leads. The designer recommends a switch obtainable on eBay, but I found that particular model to be overpriced and I don’t really trust sellers on eBay so I went with this model/seller which is far cheaper. I purchased the 250V fuses here and I repurposed the power cord from an old printer I had. Since the design was intended to be used with a slightly different socket I needed to trim the hole a little bit bigger using edge cutters and since the bezel is different you won’t have screw holes so I recommend gluing it in place. The model has 2 holes at the bottom which can be used to route the power out and ground wires that go from the power supply to the controller board. I suspect this design was made for a different power supply than the one that came with the printer kit because only one side of the power supply has a screw hole and I wound up gluing the other half of the cover into place.
Motor Mount Replacement Pieces
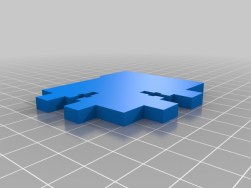
Comments: One of the pieces that was broken when I first received the kit is one of the leg pieces that are part of the Z-axis motor mount. The kit includes 4 of these guys and they’re used to attach the part that the motor is attached to, to the main frame brace. The piece that came with my kit was broken in 2 at the screw holders and I was unable to install it. Lucky for me, this is a piece that is commonly broken and one of the community’s lovely modders went ahead and designed a replacement. The file also includes left and right mounting pieces for the motors in case you want to replace those as well, but mine were both intact so I didn’t bother with them. I didn’t really like the way my printer looked with one support leg being different than the other 3 so I went ahead and made 4 of them so they’d all match.

Comments: This is just a simple cover that goes over top of the main controller board giving it a bit of protection from things that might come into contact with the electronics and cause a short. Lots of different designs exist for something like this, some of which incorporate fans or other electronics, but I didn’t feel like those kinds of additions were worthwhile at this time. I chose this design purely based on its looks since I felt it’s hexagonal pattern fit in well with the hexagonal pattern used in the frame bracing. The holes allow plenty of airflow which is important to keep the electronics cool. A downside to using this cover is that it will block access to the connectors which will complicate things if you need to unplug something, but honestly, after the printer is set up, there aren’t too many reasons you’d want to unplug anything. This particular model won’t help you hide cables either so be mindful of your cable management.
Comments: This part is a redesign of the belt pulley that comes with the kit. It allows you to adjust the amount of tension applied to the Y-axis belt by tightening 2 screws located on the front of the machine. Unlike the original pulley, this version only uses 2 of the 4 holes located on the front plate and wraps around over the top of it. This means the belt passes through the middle of the pulley and not just the highest point like before which probably helps with stability. This pulley prints in 2 pieces and will require the original spinning disk as well as 3 screws and nuts to be installed. Being able to tighten the belt without needing to detach anything is a great advantage especially if you’re using the original belts that came in the kit since they’re made of plastic and will stretch over time.


Comments: This part is a decorative bezel that goes around the LCD Screen and buttons. It also comes with an optional shutter that slides into a slot in the top and blocks light from the screen. The model comes in a variety of different designs but the differences are just cosmetic. The shutter has a large ring attached to it which I suspect was intended to be used as a filament guide, but I find its placement too low to work well with the filament holder I use. Sliding the shutter in and out also requires the filament holder be removed first since it needs to go in through the top. I would have preferred a design that lets you slide in the shutter from the side, but I don’t really need a night shutter in the first place so its no big deal. This is a fairly large piece and printing it with my preferred fill and support settings took a day and a half which means it uses a lot of plastic. I also don’t recommend printing it with the front face down since it will probably mess up the decorative features which would defeat the purpose of a cosmetic item. The bezel clips onto the acrylic frame and hold pretty well, but it can still slide around a bit. However, it can be glued down easily enough if that becomes a problem. For added appeal, I painted the inside of the recessed design black to make it stand out better. I did this by applying a good amount of acrylic paint to the front of the piece. Then, while the paint was still wet, I wiped off most of the extra with some paper towel. Then after the paint was dry, I scrubbed and sanded off any paint that wasn’t in the groves.

Comments: Alright so this is the obligatory fan duct upgrade. A lot of people would argue that this is probably the most important and first upgrade you should consider, I however don’t feel that way. In fact I discovered that a fan duct is almost completely unnecessary while using low heat settings on the extruder, meaning not only do you not need this duct you’re probably better off not using the duct provided in the kit either. However that is only for my particular setup, which requires you do all your printing with PLA at a low heat setting and rely on supports whenever dealing with even the slightest of overhangs. If I were to switch to ABS for example I’d need to rework my settings. The goal of the fan duct is to direct airflow towards the freshly extruded plastic. This cools it down quicker and should hopefully lessen any drooping that might occur while printing stuff like overhangs. Now the real problem with a lot of fan ducts is that they also blow air at the tip of the extruder which cools that down as well as the hotbed which can result in base layers lifting off the bed. Letting the plastic cool down slower gives it more time to adhere to lower layers and create stronger bonds. When the extruder gets too cold it will start failing to allow the filament to pass through it or worse get clogged by solid plastic accumulated on the exterior of the nozzle. But anyways, if you need a fan duct, this is the one that works best with my printer. The semi-circular design is my preference because it doesn’t get in the way as much as a full circular design and since the holes are all much smaller and facing downward, they don’t subject the extruder’s nozzle to too much direct airflow. I used to use a similar design that hooked onto the exterior of the fan. This was definitely a more secure means of attachment but installing the extruder fan modification from earlier prevented me from using it. So this particular design uses a compromised pinch lock system to attach to the inside of the fan. It can still fall off, but its at least somewhat better secured than a design that just uses friction and the power of prayer to stay in place. I don’t recommend gluing a fan duct in place either since it will need to be removed to clean off the extruder from time to time.
Purchased Upgrades
Comments: The belts that come with the kit are made of plastic and unfortunately will stretch and contract with use. When I first installed them I tightened them accordingly but within a week I realized that they were loose and saggy. I tightened them again which lasted a long time, but when I took the printer apart to install some upgrades I found that the belts were now too short to be reinstalled. This lead me to purchase some replacement belts with a fiberglass core. I find these belts to be much more flexible than the originals and they didn’t need to be retightened after the initial installation.
Comments: While a lot of people stand by the effectiveness of painters tape as a good build plate surface, I quickly got sick of using it. I find that it didn’t always have good adhesion with my PLA prints, it would frequently get torn up by the extruder’s nozzle on the first layer, it created an uneven surface where the edges of the tape overlapped, it wouldn’t protect the aluminum bed from getting scratched up by my prying tools and small pieces of torn up tape would get stuck to the bottom of my prints and become very difficult to remove. It was also fairly tiresome to replace after every few prints. While a BuildTak bed presents its own list of problems, I find it to be much more preferable to deal with. It has a textured surface that sticks to prints a lot better, though often it sticks too well and the process of prying the print off without damaging it becomes tedious. It gets applied to the bed as a single sheet which is fast and efficient but runs the risk of trapping air bubbles but those tend to escape on their own after a few heating/cooling cycles. It can be damaged by the hot-end if it collides with the plate but overall it is much more study than tape and will last months on end before needing to be replaced. Its long lifespan does have disadvantages though. Prying off prints tends to leave residue and debris on the surface which then gets stuck to the next print, it’s not a big problem, but if you change filament colors frequently, it will cause some of your prints to have dirty looking base layers. The textured surface does get imprinted on your prints but its hardly noticeable and the only way to avoid it would require you switch to a glass bed. The Anet A8 has a 220x220mm print bed which is slightly larger than the 8×8 inch squares I buy. If applied to the center, it should leave an exposed border just under 1cm on all sides. This does shrink your buildable surface by a tiny bit, but it also leaves the bed’s adjustment screws exposed which is worth not using the next size up which is more expensive and would need to get trimmed down. The sheets come in black or white, I guess the white sheets make it easier to see the residue that will eventually get stuck to it a bit better but it depends on your filament color. They can be a bit expensive but I’ve noticed that off-brand copies exist that are cheaper.
220x220mm Plastic Hot Bed Stickers
Speaking of which, these stickers are exactly that, low-cost imitations from China. They come in different sizes, but this one is the exact size needed to cover the entire bed. This will cover the adjustment screws which is unfortunate, but I suppose you could just cut or hole punch the sticker to get at those. These stickers are bigger, cheaper and come in a pack of 5 so honestly, they have much better value over the BuildTak ones. The real let down was the shipping time though. Purchasing these guys from Banggood took nearly 3 months to get delivered. It’s not bad if you plan your refill purchases far in advance but if you run out, and need to order more, your printer is in for a lot of downtime. I don’t have the expertise required to analyze the differences in their surfaces but as far as I can tell there are no noticeable differences in quality or performance. These ones even come with a helpful warning message reminding people not to be stupid.
The latest addition to my 3D printer is this guy. It is more or less a specially designed plate that mimics the smoothness of glass without the need for spray-on adhesives. It advertises high durability so you hopefully don’t need to worry about scratching it up with your prying tools but I still wouldn’t go out of my way to test that claim. It says it has a special porous coating which allows prints to stick well when heated but will easily detach themselves when cooled down. Due to a malfunctioning auto level sensor, I’ve been unable to give it any extensive testing as of right now, but my first impressions are pretty good. I wanted to experiment with glass in the past but was unable to because of damage from shipping. This guy costs around 40$ from the right store which is a fair bit more costly than a standard tempered glass sheet, but not unreasonably so. It comes with adhesive tape on the bottom which suggests its a permanent addition to your printer, however, I’m not willing to commit to it until I’ve tested it out more thoroughly so I’ve just got it held in place by a few blobs of hot glue for the time being. It comes in a few different sizes and the company that makes them even sells their own version of the Prusa I3 that comes with this plate included. Its a bit more expensive than my printer, but looks to be more premium as a result. I got the 214mm version of the plate that has the corners removed. It wasn’t the version I was looking for, but the other one wasn’t in stock at the time and this one does the job just as well.
Comments: I ended up breaking one of my linear bearings when I was hammering it into the motor mount replacement. It still worked, but the end cap got bent out of shape and tiny ball bearings were falling out of the end. I ended up replacing it with an identical bearing that I purchased here because it got delivered first but I also purchased Igus Drylin bearings on a recommendation from the community. These particular bearings are made from some type of plastic, which leaves the impression that they’ll wear out faster than the metal ones provided in the kit but the community assures me this isn’t the case. Because the bearings are made of plastic and don’t use any ball bearings, you can reduce the noise generated by the printer. The lack of metal on metal contact is also better for the rods. I purchased a pack of 8 and used them to replace the bearings under the bed and on the extruder chassis. I stuck with the cheap standard bearings for the vertical rods, but when you consider how little they move compared to the bed and extruder the upgrade isn’t worth the investment. The new bearings claim to not need any lubrication to work, but I continue to use machine oil on the rods every now and then anyway. Installing the new bearings involves removing the bearing mounts and applying enough pressure to the inserted bearing to push it out of the housing. From there you just need to hammer the new bearings into place and reinstall the mounts. I notice that the Igus Drylin bearings are shorter in length than the default ones but I don’t think it changes anything.
Comments: This thing is handy, safer and good looking. One of the best upgrades you can add to your printer, in my opinion, is a power switch. Since cutting the power will immediately stop the motors and hopefully save your printer from trying to break itself if the auto level sensor doesn’t stop the printer from driving the hot end into your heated bed. This particular model also comes with a fuse to prevent a power surge from damaging the electronics and an AC power socket which lets you remove the power cable without unscrewing anything or having exposed wires.
